I have recently contributed to the official SharePoint documentation for developement. Check it out here:
https://docs.microsoft.com/en-us/sharepoint/dev/sp-add-ins/working-with-lists-and-list-items-with-rest
Saturday, January 5, 2019

Wednesday, July 4, 2018
Thursday, December 14, 2017
Knowledge Chat Bot (No Code)
Recently my customers was looking for a solution where on-field guys can search for answers related to their tasks and it was a perfect scenario to develop a Chat Bot. Microsoft Bot Framework has been available for quite some time now and its functionality is keep on getting enhanced with different aspect of Artificial Intelligence like speech recognition, face recognition etc. With yesterday's announcement of GA of Azure Bot Services, now we have one place to develop, deploy and expose our intelligent bots to channels like Web, Skype, FB Messenger etc.
In this post, I will walk you through Azure Bot Services(https://docs.microsoft.com/en-us/Bot-Framework) to build and connect a bot but first we need to build our bot's brain and fill it with the knowledge using QnAMaker( http://qnamaker.ai).
This post is divided into following three sections:
Architecture
Following is the architecture of our solution where we will build a service (bot's brain) in QnA Maker and then fill it with our Knowledge Base. Then we will create our bot in Azure Bot Services and link it to the bot's brain (MyBotService) and then we can publish our bot via different channels. We can use Channels to display our bot inside a SharePoint Page, Skype, Teams, Facebook Messenger etc.

Building the Knowledge Base (KB)
Building the Chat Bot
In this post, I will walk you through Azure Bot Services(https://docs.microsoft.com/en-us/Bot-Framework) to build and connect a bot but first we need to build our bot's brain and fill it with the knowledge using QnAMaker( http://qnamaker.ai).
This post is divided into following three sections:
- Architecture
- Building the Knowledge Base (KB)
- Building the Chat Bot
Architecture
Following is the architecture of our solution where we will build a service (bot's brain) in QnA Maker and then fill it with our Knowledge Base. Then we will create our bot in Azure Bot Services and link it to the bot's brain (MyBotService) and then we can publish our bot via different channels. We can use Channels to display our bot inside a SharePoint Page, Skype, Teams, Facebook Messenger etc.

- Log on to QnA Maker at https://qnamaker.ai.
- Select Create New Service tab and provide name of the bot service e.g. MyBotService, leave remaining fields as it is and hit Create button to create the service which will serve as brain of the bot.

- You should see the screen where you can provide the knowledge base for your bot. Add couple of questions and their answers by selecting + Add QnA Pair. Once you add few QnA pairs, hit Save and retrain to train your model. You can also provide the questions and answers in text, pdf and document format.

- You can select Test tab to test the knowledge base in chat format.
- Hit Publish once testing is done, and then hit publish again on the next screen to publish MyBotService to the web. We will consumed this service through our Bot.
- Once the MyBotService is published, Save the two values highlighted in the screen shot below as QnAKnowledgebaseId and QnASubscriptionKey. We need this information in our Bot's settings.


Building the Chat Bot
- Log on to Azure at http://portal.azure.com.
- Select New and go to AI + Cognitive Services section and choose Web App Bot.

- Provide a unique Bot Name (e.g. DemoBot101), select Subscription and then choose Bot template as Question and Answer. You can also choose between C# or Node.js SDK which doesn't matter in this case as we are not writing any code. Select Create button at the end to create the Bot.

- Once the basic bot has been created you will be notified and select Go to resources from the notification section to see the Bot's details, settings etc.

- Select Application Settings of the bot and go to the App settings section and provide the value of the keys QnAKnowledgebaseId and QnASubscriptionKey which we copied while creating the MyBotService and hit Save.

- Now you can test the bot from Test in Web Chat tab.

- Once the testing is completed, this Chat Bot can be published to web, Skype, Teams, MSN Messenger etc via Channels.


Wednesday, October 18, 2017
Publishing Sites vs Communication Sites
It was announced in SharePoint Virtual Summit in May 2017, a more modern way of content publishing is released called Communication Sites. Now you can read all about Communication sites here and here, I am going to focus on the major differences between the daddy (Publishing Sites) and the newborn (Communication Sites) since both are geared towards a similar requirement.....Content Publishing.
When NOT to use Publishing & Communication Sites?
If you have a scenario where few people (generally one or two) are creating content for a larger audience (generally whole organization) then use publishing sites or more recommended communication sites.
 If a smaller group is communicating/collaborating among them solves (just like a team would do) then use Team Sites. Do not use Publishing Sites or Communication Sites for such scenarios. Its an over kill. Also between small groups the communication is generally two way.

Publishing Sites vs Communication Sites:
Conclusion:
Now that we have learned the major differences between the both site types, here is what we should do in order to choose between them.
We should start designing publishing solutions with Communication sites in mind. It gives many features OOB which have been requested by customer again and again, specially the responsive UI. It is quicker to create content, faster to publish and cleaner to manage Communication sites without any developer's involvement. At this point it does not have features like cross-site publishing, Approval workflow, multi language etc but many(not all) of these features are in pipeline as told in community forum :o).
Note: Publishing Sites are not deprecated at this point.
On the other hand Publishing Site have more functionality at this point and gives you more control over branding as you can introduce your own HTML/CSS and can write custom MasterPages. But this great functionality comes at the cost of custom code and developer's involvement which can result in higher cost for publishing.
When NOT to use Publishing & Communication Sites?
If you have a scenario where few people (generally one or two) are creating content for a larger audience (generally whole organization) then use publishing sites or more recommended communication sites.


Publishing Sites vs Communication Sites:


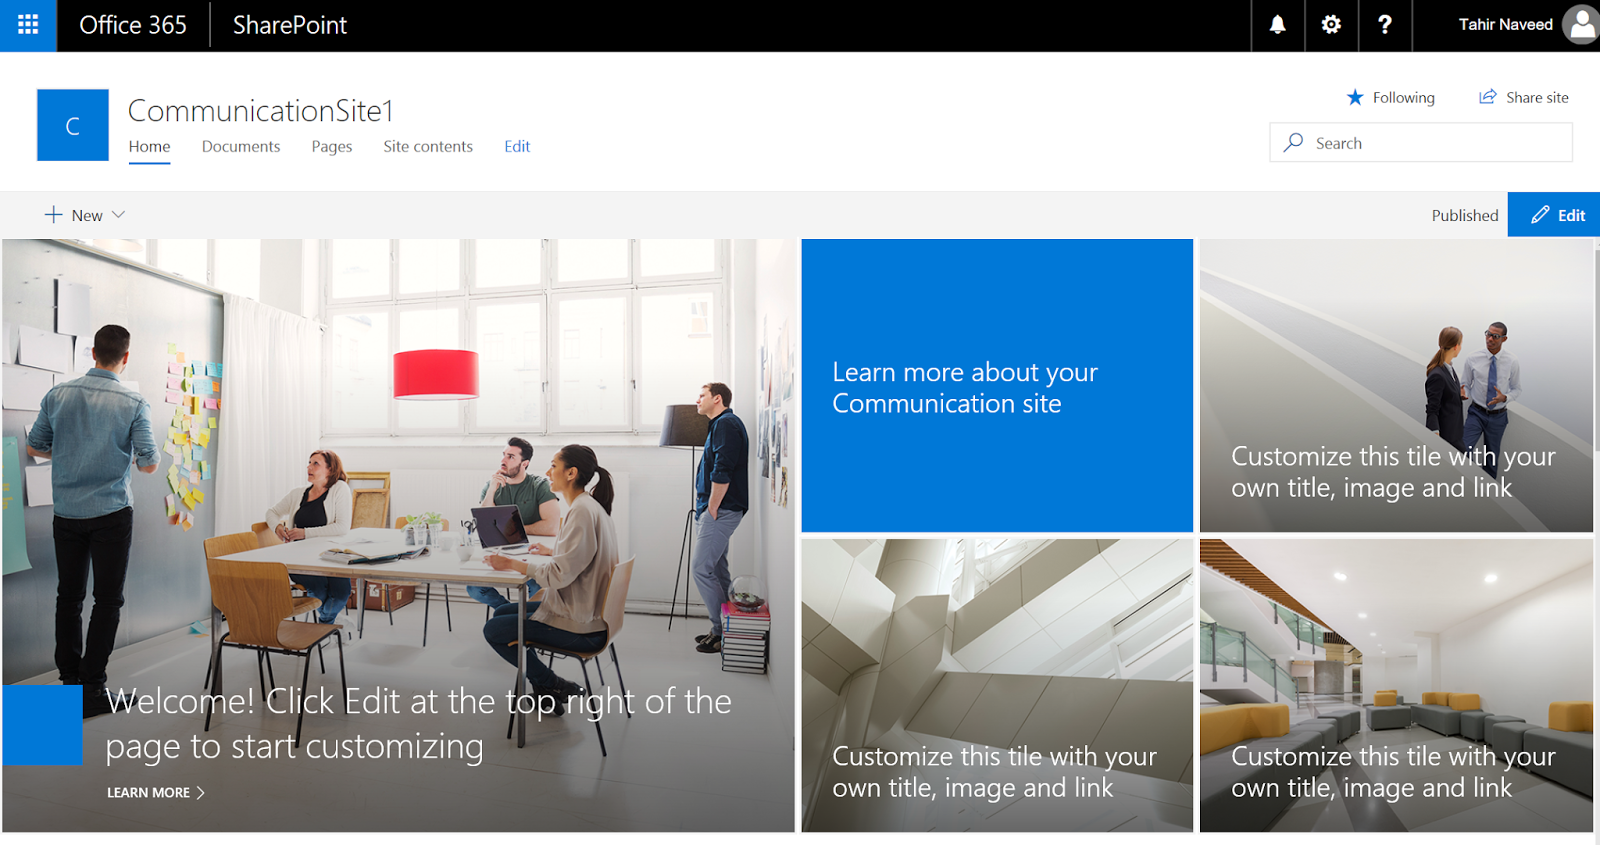


Conclusion:
Now that we have learned the major differences between the both site types, here is what we should do in order to choose between them.
We should start designing publishing solutions with Communication sites in mind. It gives many features OOB which have been requested by customer again and again, specially the responsive UI. It is quicker to create content, faster to publish and cleaner to manage Communication sites without any developer's involvement. At this point it does not have features like cross-site publishing, Approval workflow, multi language etc but many(not all) of these features are in pipeline as told in community forum :o).
Note: Publishing Sites are not deprecated at this point.
On the other hand Publishing Site have more functionality at this point and gives you more control over branding as you can introduce your own HTML/CSS and can write custom MasterPages. But this great functionality comes at the cost of custom code and developer's involvement which can result in higher cost for publishing.
Monday, June 12, 2017
Microsoft Flow - HTTP REST Call
In this blog post, I will cover what is a workflow and how we can create a workflow using Microsoft Flow that can make HTTP REST calls to bring the stock price and then I will discuss how we can use this workflow in a iPhone app in following sections:
My definition of a workflow is, steps to complete a task. That's it :o).
For example, if you want to get your driving license then you follow the steps provided on the DMV's site (1-Bring documents, 2-Fill paper work, 3-Get your photo taken, 4-Pay fee). In this example, our task is to get the driving license and in order to complete this task we have to follow four steps.
So without further due lets create a workflow which will make HTTP REST call to grab stock quote of a provided ticker....and we will be using this workflow in our iPhone.
Ref: https://docs.microsoft.com/en-us/azure/logic-apps/logic-apps-workflow-definition-language
- Workflow
- Microsoft Flow
- HTTP REST Call from MS Flow
- Using the Workflow in the Flow App
My definition of a workflow is, steps to complete a task. That's it :o).
For example, if you want to get your driving license then you follow the steps provided on the DMV's site (1-Bring documents, 2-Fill paper work, 3-Get your photo taken, 4-Pay fee). In this example, our task is to get the driving license and in order to complete this task we have to follow four steps.
Microsoft Flow:
In SharePoint world we used to have SharePoint Designer (which we all love) to create workflows and do other stuff. Now that there is not going to be a newer version of SPD, Microsoft has provided another awesome way of creating workflows called Microsoft Flow. Its a cloud based service which lives outside the SharePoint world, can be used on a mobile phone and can interact with many services like SPO list/lib, Outlook, Azure, Salesforce, Twitter, Google Drive, Gmail and the list goes on and on. Microsoft Flow is a no-code/low-code solution and it can also interact with SharePoint on-prem. So without further due lets create a workflow which will make HTTP REST call to grab stock quote of a provided ticker....and we will be using this workflow in our iPhone.
HTTP REST Call from MS Flow:
- Go to Microsoft Flow, sign-in and create an empty flow "Stock Price".
- Now I am going to add steps to trigger the workflow manually which will make an HTTP REST call and then parse the results and show me the price in a mobile notification.
- For that my workflow will have following steps: An input button, HTTP Request step, Compose step, Parse JSON step and then Mobile Notification step as shown in the diagram below:
- Manually trigger a workflow step adds a button on your iPhone app which takes a stock ticker input. You have to install the Flow app from the App Store in order to view it.

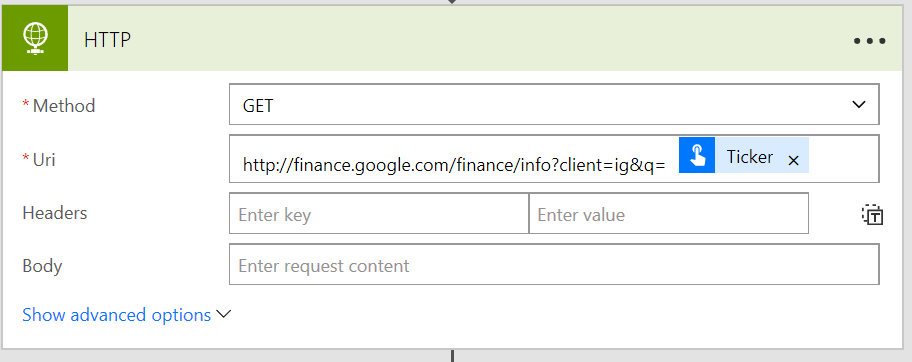
- HTTP step will make REST call to google finance API via GET method by providing the stock ticker taken in the previous step. e.g. http://finance.google.com/finance/info?client=ig&q=MSFT
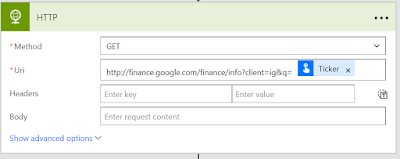
- As a result we will get JSON response. I added Compose step to strip out the special characters in the response by using a WDL(Workflow Definition Language) function: "@replace(body('HTTP'), '// ', '')".

- After removing the special characters I should be able to parse JSON by providing a valid schema. You can generate schema by adding your response to the blue link provided at the bottom of this step.

- Now lets add the notification step and add Ticker and l outputs to the Text field of this step. Note that notification step will be placed inside the loop automatically as JSON response can have multiple results for l.
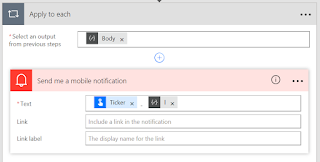




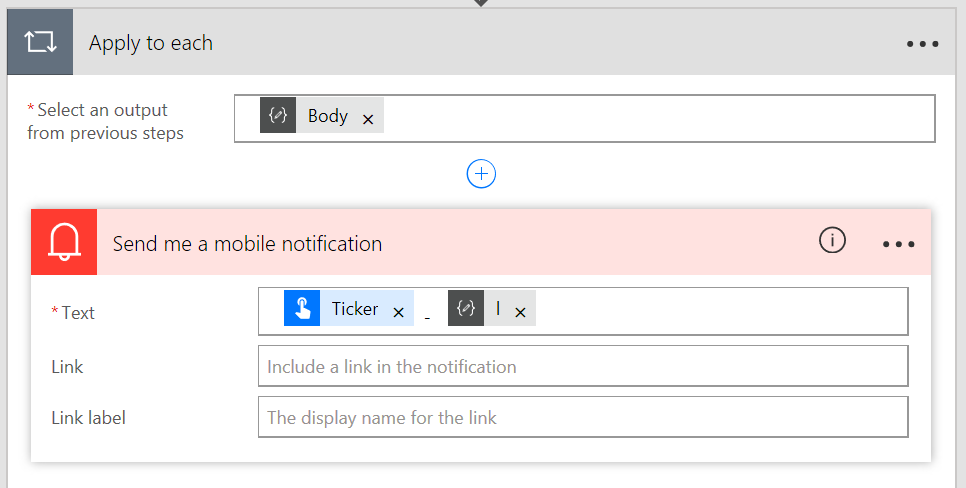
Using the Workflow in the Flow App
- Install the Flow app from App Store in your iPhone.
- Sign-in and go to the Buttons. You should be able to see all your buttons there.
- Click "Stock Price" button and provide the symbol MSFT and then hit Done.


- This will start the workflow and you should get the push notification with the stock ticker with the price quote in it.


Ref: https://docs.microsoft.com/en-us/azure/logic-apps/logic-apps-workflow-definition-language
Thursday, May 25, 2017
SharePoint Online Page Load Time with JavaScript
Scenario:
We know that Microsoft don't recommend any kind of load testing against SharePoint Online pages as mentioned here but still customers want to know how much time it takes to load a page to get a feel of the end user experience.
Solution:
To find the page load times, browsers (Edge, Chrome & Firefox) now have built-in support of Navigation Timing which is a JavaScript API to measure the performance of a web page. This API is exposed via performance.timing object. Performance Timing API provides following events of for a web page, which we can use in JavaScript to get the different times of page load:

We know that Microsoft don't recommend any kind of load testing against SharePoint Online pages as mentioned here but still customers want to know how much time it takes to load a page to get a feel of the end user experience.
Solution:
To find the page load times, browsers (Edge, Chrome & Firefox) now have built-in support of Navigation Timing which is a JavaScript API to measure the performance of a web page. This API is exposed via performance.timing object. Performance Timing API provides following events of for a web page, which we can use in JavaScript to get the different times of page load:

Here is an example of JavaScript that calculates the complete page load time, starting from the user pressing the Go button in the browser till the page renders completely:
Load Time: <div id="LoadTime"> </div>

<script type="text/javascript" >

window.onload = function(){
  setTimeout(function(){
    var t = performance.timing;
    document.getElementById('LoadTime').innerHTML = t.loadEventEnd - t.navigationStart;
  }, 0);
}

</script>
Note that above script is calculating difference between loadEvendEnd (very last event) and navigationStart (very first event) which is simulating the end user experience. The time will be displayed in milliseconds.
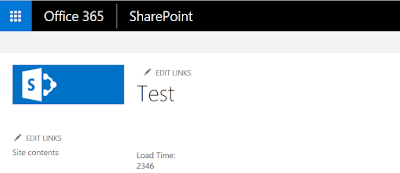
Similarly we can calculate the time between the request sent to server and response that came back from the server by calculating the difference between responseEnd and requestStart events.

Similarly we can calculate the time between the request sent to server and response that came back from the server by calculating the difference between responseEnd and requestStart events.
Tuesday, November 1, 2016
Microsoft Graph vs Office Graph
Microsoft introduced Office Graph a couple of months back which uses machine learning techniques to connect people to the relevant content, conversations and other people around them in Microsoft Cloud (Office 365). Now Microsoft recently introduced Microsoft Graph, which is a unified API endpoint, for accessing data, intelligence, and insights in the Microsoft cloud...and everybody is now confused :o). In this post I will try to explain the difference.
What is Graph?
According to wikipedia graph also known as social graph is described as:
The social graph in the Internet context is a graph that depicts personal relations of internet users. In short, it is model or representation of a social network, where the word graph has been taken from graph theory to emphasize that rigorous mathematical analysis will be applied as opposed to the relational representation in a social network.
Which means that how a person on internet is related or linked to another person and/or object(like document, image etc).This term was popularized by Facebook...for obvious reasons :o).
Office Graph:
The Office Graph uses machine learning algorithms to learn how a Office 365 user is connected to other users, content(documents etc) and conversations in a tenant and create a graph based on it in order to make suggestions.
If you go to Delve, the yellow section shows the information generated automatically based on Office Graph:

If we disable office graph by going into the SharePoint settings:
 then Delve will not show the information generated by the office graph, it will only show basic about me information:

Microsoft Graph:
Microsoft Graph is an API with a single end point to access data, intelligence and insights from Microsoft Cloud (Office 365).

Let's understand it by an example, imagine a scenario where an app has to access a user's email attachment, upload it to SharePoint and then notify user's manager. Now that app needs to get authenticated first and then go to Outlook to grab emails and then go to SharePoint to upload files, which means dev have to have to work with three different set of APIs (Active Directory, Outlook and SharePoint). To overcome such scenarios Microsoft has introduced one API (Graph API) to talk to all Office 365 products. Microsoft Graph API is one API to rule them all.
Access Office Graph via MS Graph: Microsoft Graph API does not depend on Office Graph. However it can provides more functionality when Office Graph is enabled e.g. trends and related people etc. Click here to learn more.
Note: For SharePoint developers: MS Graph API is not here to kill CSOM and SharePoint REST API.
MS Graph API calls can be tested before writing the app with Graph Explorer: https://graph.microsoft.io/en-us/graph-explorer

Ref: https://en.wikipedia.org/wiki/Social_graph
Ref: https://dev.office.com/officegraph
Ref: https://graph.microsoft.io
What is Graph?
According to wikipedia graph also known as social graph is described as:
The social graph in the Internet context is a graph that depicts personal relations of internet users. In short, it is model or representation of a social network, where the word graph has been taken from graph theory to emphasize that rigorous mathematical analysis will be applied as opposed to the relational representation in a social network.
Which means that how a person on internet is related or linked to another person and/or object(like document, image etc).This term was popularized by Facebook...for obvious reasons :o).
Office Graph:
The Office Graph uses machine learning algorithms to learn how a Office 365 user is connected to other users, content(documents etc) and conversations in a tenant and create a graph based on it in order to make suggestions.
If you go to Delve, the yellow section shows the information generated automatically based on Office Graph:

If we disable office graph by going into the SharePoint settings:


Microsoft Graph:
Microsoft Graph is an API with a single end point to access data, intelligence and insights from Microsoft Cloud (Office 365).

Let's understand it by an example, imagine a scenario where an app has to access a user's email attachment, upload it to SharePoint and then notify user's manager. Now that app needs to get authenticated first and then go to Outlook to grab emails and then go to SharePoint to upload files, which means dev have to have to work with three different set of APIs (Active Directory, Outlook and SharePoint). To overcome such scenarios Microsoft has introduced one API (Graph API) to talk to all Office 365 products. Microsoft Graph API is one API to rule them all.
Access Office Graph via MS Graph: Microsoft Graph API does not depend on Office Graph. However it can provides more functionality when Office Graph is enabled e.g. trends and related people etc. Click here to learn more.
Note: For SharePoint developers: MS Graph API is not here to kill CSOM and SharePoint REST API.
MS Graph API calls can be tested before writing the app with Graph Explorer: https://graph.microsoft.io/en-us/graph-explorer

Ref: https://en.wikipedia.org/wiki/Social_graph
Ref: https://dev.office.com/officegraph
Ref: https://graph.microsoft.io
Tuesday, October 25, 2016
Office365 Subsite Logo Redirection
Scenario:
Sub-site logo points to the sub-site's home page by default...and the requirement is to point it to the top level site's.
Solution:
We can not change Master Page in Office365/SharePoint Online site so we need to embed/inject the following JavaScript:
Sub-site logo points to the sub-site's home page by default...and the requirement is to point it to the top level site's.
Solution:
We can not change Master Page in Office365/SharePoint Online site so we need to embed/inject the following JavaScript:
<script type="text/javascript" src="https://ajax.googleapis.com/ajax/libs/jquery/1.7.2/jquery.min.js"></script>

<script language="javascript" type="text/javascript">

$(document).ready(function () {

    $('#ctl00_onetidProjectPropertyTitleGraphic').attr('href','/sites/Portal');
    $('#ctl00_onetidProjectPropertyTitleGraphic').removeAttr('id');

});

</script>
Tuesday, September 13, 2016
PowerShell Script Analyzer
"PSScriptAnalyzer is a static code checker for Windows PowerShell modules and scripts. PSScriptAnalyzer checks the quality of Windows PowerShell code by running a set of rules. The rules are based on PowerShell best practices identified by PowerShell Team and the community. It generates DiagnosticResults (errors and warnings) to inform users about potential code defects and suggests possible solutions for improvements."
Ref: https://github.com/PowerShell/PSScriptAnalyzer
Lets put this to the test. I have written following basic PowerShell Script in Visual Studio Code (because it is an awesome tool and it has a PowerShell extension that give you features like IntelliSense, Goto definition, Debugging etc) and will be running the Script Analyzer on the script file. In this script I am calling a function that will display a string stored in a variable.

Open the Windows PowerShell Console and lets install the PSScriptAnalyzer module (This module is available in v 5.0 and above by default):
Verify if the commands are available for this module:

Run the Script Analyzer on our test script:

Now the ScriptAnalyzer is showing me one warning in my most simplest script that Write-Host (which I have been using my whole life) is obsolete and use Write-Output instead.....which is awesome :o). And that's how easily we can do static analysis based on the built-in rules on our PowerSell scripts.
To get the complete list of rules, use the following command:
Ref: https://github.com/PowerShell/PSScriptAnalyzer
Lets put this to the test. I have written following basic PowerShell Script in Visual Studio Code (because it is an awesome tool and it has a PowerShell extension that give you features like IntelliSense, Goto definition, Debugging etc) and will be running the Script Analyzer on the script file. In this script I am calling a function that will display a string stored in a variable.

Open the Windows PowerShell Console and lets install the PSScriptAnalyzer module (This module is available in v 5.0 and above by default):
Install-Module -Name PSScriptAnalyzer -Force
Verify if the commands are available for this module:
Get-Command -Module PSScriptAnalyzer

Run the Script Analyzer on our test script:
Invoke-ScriptAnalyzer -Path C:\Users\user1\Desktop\Test.ps1

Now the ScriptAnalyzer is showing me one warning in my most simplest script that Write-Host (which I have been using my whole life) is obsolete and use Write-Output instead.....which is awesome :o). And that's how easily we can do static analysis based on the built-in rules on our PowerSell scripts.
To get the complete list of rules, use the following command:
Get-ScriptAnalyzerRule
Sunday, June 12, 2016
SharePoint DSC
SharePoint DesierState Configuration has Ben released.
Url: https://github.com/PowerShell/SharePointDsc
While in pre-release mode it was called xSharePoint.
Url: https://github.com/PowerShell/SharePointDsc
While in pre-release mode it was called xSharePoint.
Thursday, March 10, 2016
SharePoint Online - JavaScript Injection with PowerShell
Scenario:
Updating the Master Page for SharePoint Online is not recommended by Microsoft now.....fine. So how do we change the UI then? And the answer is...by injecting JavaScript and CSS.
Solution:
You might want to watch this video of JavaScript injection which we will not follow here as injecting JavaScript and/or CSS through Visual Studio takes little bit of time as shown in the above video so I am putting pieces together to inject JavaScript using PowerShell very very...very quickly. Thank you Office Dev PnP's Erwin van Hunen.
Note: We are not going to use SharePoint Online Management Shell ;o) instead we will use Windows PowerShell.
Ref: OfficeDev/PnP-PowerShell Reference
Updating the Master Page for SharePoint Online is not recommended by Microsoft now.....fine. So how do we change the UI then? And the answer is...by injecting JavaScript and CSS.
Solution:
You might want to watch this video of JavaScript injection which we will not follow here as injecting JavaScript and/or CSS through Visual Studio takes little bit of time as shown in the above video so I am putting pieces together to inject JavaScript using PowerShell very very...very quickly. Thank you Office Dev PnP's Erwin van Hunen.
Note: We are not going to use SharePoint Online Management Shell ;o) instead we will use Windows PowerShell.
- Install PnP PowerShell Cmdlets for SharePoint Online
Url: https://github.com/officedev/pnp-powershell/releases - Perform a quick test: Run the command below in Windows PowerShell to see if it is available
Get-Command Add-SPOJavaScriptBlock
- Connect to the site where you want to push JavaScript code:
Connect-SPOnline https://tenant.sharepoint.com/sites/portal
- Push the JavaScript code.
Add-SPOJavaScriptBlock -Name MyScript -Script "alert('Hello World');"
or
Add-SPOJavaScriptLink -Name JQuery -Url https://code.jquery.com/jquery.min.js
- You are done. Now browse the site and you will get the annoying Hello World alert on all the pages.





#
# This is a sample script and is provided as is.
# Author: Tahir Naveed
# Description: This script connects to a SPO site and
# injects a JavaScript code block which will execute on all of the pages.
#
#

$url = "https://tenant.sharepoint.com/sites/portal"
$ScriptName = "MyScript"
$scriptBlock = "alert('Hello World');"

try
{
    #Connect to the SPO site
    Connect-SPOnline $url

    #Remove script if added before
    Remove-SPOJavaScriptLink -Name $ScriptName

    #Add the script
    Add-SPOJavaScriptBlock -Name $ScriptName -Script $scriptBlock

}
catch
{
    Write-Host "$_.Exception.Message"
}

Write-Host "Completed successfully." -ForegroundColor Green
Ref: OfficeDev/PnP-PowerShell Reference
Thursday, March 3, 2016
SharePoint - Export/Import Subsite
Scenario:
Lets suppose we have two SharePoint 2013 site collections and we want to export a sub-site from one site collection to another using PowerShell, then below is the answer.
Source: http://domain.com/sites/Site1/SubsiteA
Destination: http://domain.com/sites/Site2/SubsiteA
Solution:
Note: All the list, libraries, documents etc will get exported except for the workflows.
Ref: https://technet.microsoft.com/en-us/library/ff607895.aspx
Ref: https://technet.microsoft.com/en-us/library/ff607613.aspx
Ref: https://technet.microsoft.com/en-us/library/ee663490.aspx
Lets suppose we have two SharePoint 2013 site collections and we want to export a sub-site from one site collection to another using PowerShell, then below is the answer.
Source: http://domain.com/sites/Site1/SubsiteA
Destination: http://domain.com/sites/Site2/SubsiteA
Solution:
Export: Export-SPWeb "http://domain.com/sites/Site1/SubsiteA" -Path "C:\Temp\Export.cmp"
Import: Import-SPWeb "http://domain.com/sites/Site2/SubsiteA" -Path "C:\Temp\Export.cmp"
Note: All the list, libraries, documents etc will get exported except for the workflows.
Ref: https://technet.microsoft.com/en-us/library/ff607895.aspx
Ref: https://technet.microsoft.com/en-us/library/ff607613.aspx
Ref: https://technet.microsoft.com/en-us/library/ee663490.aspx
Wednesday, February 10, 2016
SharePoint - PowerApps (Mobile Apps)
So I can create mobile apps for Office365 without writing any code using Microsoft Power Apps......This is Awesome.
URL: https://powerapps.microsoft.com/en-us/tutorials/get-started-test-drive/#save-and-share-your-app
URL: https://powerapps.microsoft.com/en-us/tutorials/get-started-test-drive/#save-and-share-your-app
Friday, December 4, 2015
SharePoint - Responsive Design (Framework)
You can go to my previous post where I have explained how to implement responsive design in a SharePoint site using Bootstrap from scratch. Now we you will quickly figure out that implementing responsive design from scratch will take a lot of time, effort and learning. So in order to save time we will use a pre-built framework developed by a team of awesome people.
Perform following steps for SharePoint Online sites:
Perform following steps for SharePoint Online sites:
- Download the WSP.
- Follow page 17-22 of the documentation.
- And the site will look like this:

 DesktopMobile
 - Now after the site has been made responsive and works all great. You can download the Master Page foundation-4.3.2-server.master and customize according to your own branding. See pages 23-25 of the documentation.


Tuesday, December 1, 2015
SharePoint - Responsive Design (Bootstrap)
SharePoint Online pages are after all rendered as HTML/CSS and Java Script. In this post I will show how to create a responsive design for SharePoint Online pages using Bootstrap so that they look elegant on different screen sizes (Desktop, tablet, phone) .
Bootstrap is the most popular HTML, CSS, and JS framework for developing responsive, mobile first projects on the web. You can start learning about bootstrap here.
HTML Framework:
Following is the HTML framework that a HTML page should match in order to be responsive to multiple screen sizes.
This code will create 2 responsive divs inside a main container div. Container div will render the content inside the two divs as following on Desktop and the Mobile devices with the help of Bootstrap libraries:
Responsive SharePoint Page:
Now lets incorporate this framework in to a SharePoint Site.
Bootstrap is the most popular HTML, CSS, and JS framework for developing responsive, mobile first projects on the web. You can start learning about bootstrap here.
HTML Framework:
Following is the HTML framework that a HTML page should match in order to be responsive to multiple screen sizes.
<html lang="en">
  <head>
    <title>Bootstrap 101</title>

    <!-- Latest compiled and minified CSS -->
    <link rel="stylesheet" href="https://maxcdn.bootstrapcdn.com/bootstrap/3.3.5/css/bootstrap.min.css">

    <!-- Latest compiled and minified JavaScript -->
    <script src="https://maxcdn.bootstrapcdn.com/bootstrap/3.3.5/js/bootstrap.min.js"></script>

  </head>
  <body>

    <div class="container">
        <div class="row">
            <div class="col-sm-6" style="border:1px red solid">Hello</div>
            <div class="col-sm-6" style="border:1px green solid">World</div>
        </div>
    </div>

  </body>
</html>
This code will create 2 responsive divs inside a main container div. Container div will render the content inside the two divs as following on Desktop and the Mobile devices with the help of Bootstrap libraries:
 |  |
Desktop
|
Mobile
|
Responsive SharePoint Page:
Now lets incorporate this framework in to a SharePoint Site.
- Add following lines in the head tag of Master Page:

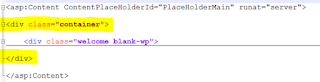
- Add the container div in the page inside the PlaceHolderMain tag so that all the HTML of the page resides inside the container div:
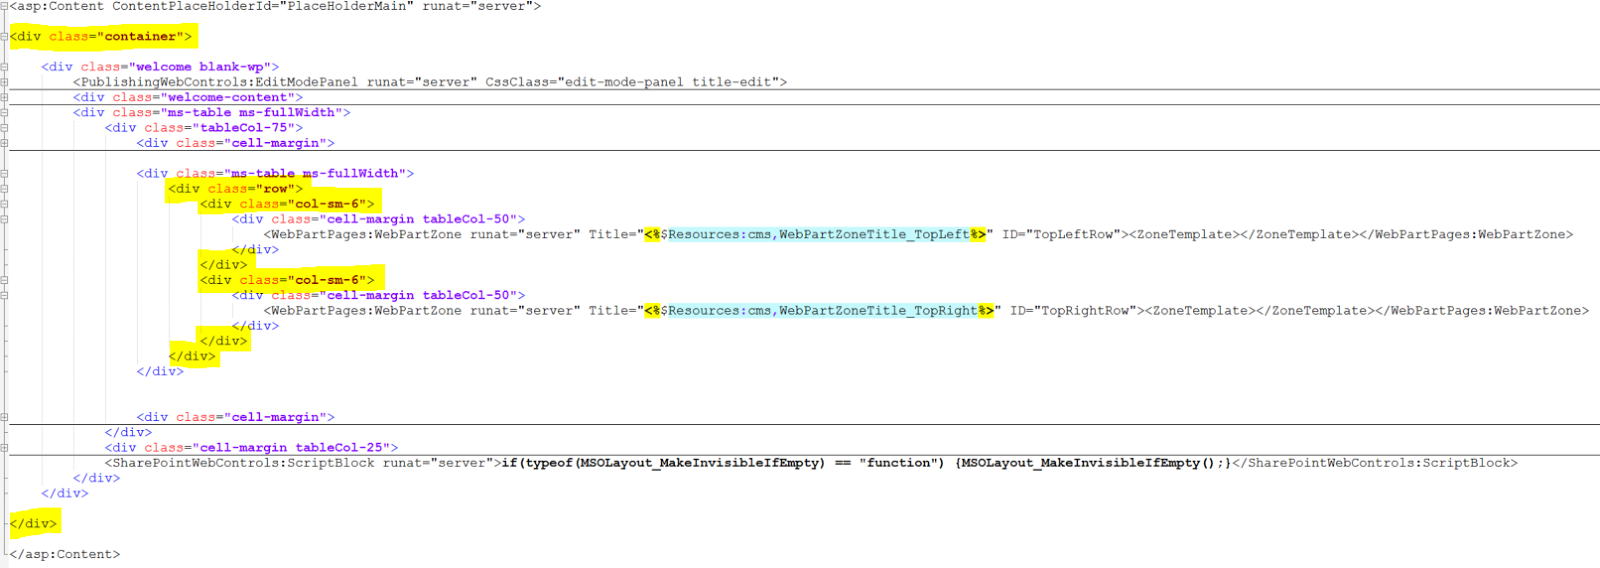
- Add the row div and then add the column divs to hold the actual web parts:

- Now the web parts on the page will be managed by container div and page will look like this on different screens:

 DesktopMobile




Subscribe to:
Posts (Atom)
-
 Scenario: Updating the Master Page for SharePoint Online is not recommended by Microsoft now.....fine. So how do we change the UI then? And...
 -
 Microsoft introduced Office Graph a couple of months back which uses machine learning techniques to connect people to the relevant content,...
 -
 Recently my customers was looking for a solution where on-field guys can search for answers related to their tasks and it was a perfect scen...