Top Menu

Showing posts with label List. Show all posts

Tuesday, December 3, 2013

PowerShell - Get List Size

Following is the PowerShell script to get the size of a SharePoint list by calculating the size of the attachments for all items in a list:
function GetListSize($List)
{
    [long]$listSize = 0
    $allAttachmentsFolder = $List.RootFolder.SubFolders["Attachments"]

    foreach ($listItem in $List.Items)
    {                   
        $listItemAttachments = $listItem.Attachments
        $attachmentsFolder = $allAttachmentsFolder.SubFolders[$listItem.ID]
        foreach($file in $listItemAttachments) 
        {            
            $listSize += $attachmentsFolder.Files[$file].Length
        }
    }

    $totalInMb = ($listSize/1024)/1024
    $totalInMb = "{0:N2}" -f $totalInMb

    return $totalInMb    
}

Ref: http://sharepoint.stackexchange.com/questions/12652/get-total-size-of-attached-files-on-all-list-items-in-sharepoint-2007with-powers

Thursday, July 12, 2012

SharePoint 2010 - Implementing Search in a List (No Code)

This article has also been published at the NothingButSharePoint.

Description: This tutorial explains how to implement search functionality in a list without any code.

I recently had a requirement of implementing a search page for a List where user pass a search phrase via Query String (e.g. http://SharePoint2010:1000/Pages/Search.aspx?q=hello) and the search page will display the results from a List, based on that search phrase. I am excited to share the technique where one don't have to write a code to develop such page and everything can be taken care of easily via SharePoint Designer.


This technique can also be used in SharePoint 2007 via SharePoint Designer 2007. However the Data View web part's options are available on Data View context menu instead of the tool bar.


Here is the Page's code with text field and button to pass the search string to the Search.aspx page.
<script type="text/javascript">
function Redirect()
{
    window.location = "http://SharePoint2010:1000/Pages/Search.aspx?q=" + document.getElementById('Text1').value;
}
</script>

<input name="Text1" type="text">
<button name="Abutton1" onclick="Redirect();">button</button>

Wednesday, December 16, 2009

SharePoint 2010 - List Relationship

Today, I got the access to the SharePoint 2010 Beta and guess what I saw? The most beautiful thing that could happen to the SharePoint lists...Relationships. Just like Database relations. :o)

Lets take a look at the following screen shot: While creating a lookup column in a list, I noticed following enhancements:

  1. I can choose ID Column from the parent list.Very very important for building reports/views.
  2. If I choose other column (Title etc), I still can include ID as an additional field.
  3. Restrict & Cascade delete option. :o) If I choose restrict and want to delete parent item, having child items...it will not allow me to do so. If I choose cassade and want to delete parent item...it will delete all the child items along with the parent.

SharePoint 2010 Lists rock!

Friday, December 11, 2009

Join Lists Using SharePoint Designer 2007

Background:
There is no parent-child relationship support in MOSS 2007 lists by default. But as a developer, we all know it is the most common functionality while storing and displaying the data. Following is the technique that I discovered somewhere on the internet to display the data using DataView Control in SharePoint Designer(while developing reports for my last project), but unfortunatily I lost the original source and thought to reproduce it in my blog with some enhancements.

Implementation:
Following are the steps to perform Inner Join on two lists using DataView Control in SharePoint Designer:

1. We need following two lists(with data in them):
  • Department (ID, Title)
  • Student (ID,Department_x0020_ID, Title)


  • 2. Open SharePoint Designer and create a new ASPX page.

    3. Create a linked datasource by following steps:
    1. Select Create a new Linked Source... from Data Source Library tab.

    2. In Data Source Properties dialog, select Configure Linked Source... button.

    3. From Link Data Sources Wizard, select Students and Department Lists and hit Next.

    4. Choose Join the contents... option and select Finish.

    5. Then select OK to get the New Data Source.

    6. Expand the New Data Source and select Show Data option.

    7. Under Data Source Details tab, you should see both lists (Department and student).


    4. Insert a Data View control into the ASPX page.
    5. Under Data Source Details tab, expand the Students list and drag and drop the Title column to Data View control and it will display all the students.
    6. Now place your cursur in Title column and select Table -> Insert -> Column to Right. In this column we will display Department.Title.
    7. Place your cursor on the first row of new column, select Title Column from Department list and select the Insert selected field as... button and choose Joined Subview opion.
    8. In Join Subview dialog, select Department_x0020_ID = ID and hit OK. (Pic 12)
    9. Thats it :o).
    10. Play with the HTML to make it look like a report.

    Wednesday, June 3, 2009

    SharePoint: List Event Handler

    Sometimes we get business requirements like populate a particular field with some pre-defined specific data when item is added or send an alert when item is added etc. SharePoint Designer Workflows solve these kind of basic problem like sending alerts, update the list item etc BUT you need event handlers to be more flexible and to have more control.

    In this post I will explain how to quickly develop and deploy SharePoint List Events.

    1. Create a Class Library Project.
    2. Add reference to SharePoint DLL.
    3. Inherit your class with SPItemEventReceiver
    4. Override ItemAdded(SPItemEventProperties properties) function
    5. Your code should look like:


    using System;
    using System.Collections.Generic;
    using System.Linq;
    using System.Text;
    using Microsoft.SharePoint;

    namespace SPListEvents
    {
    public class CandidateListHandler: SPItemEventReceiver
    {
    public override void ItemAdded(SPItemEventProperties properties)
    {
    try
    {
    SPListItem item = properties.ListItem;
    item["Status"] = "Added";
    item["Company"] = "Company1";
    item.Update();

    }
    catch (Exception exp)
    {
    //do something with exp
    }
    finally
    {
    base.ItemAdded(properties);
    }
    }
    }
    }

    Above code will get fired on the associated list, when a new item will be created. Pretty easy hah.

    6. Sign your dll by selecting Project -> Properties ->
    Signing Tab and should look like:


    7. Compile
    8. Deploy the SPListEvents.dll to GAC (c:\windows\assembly)

    Note down the Public Key Token for the installed DLL to use it in the below deployment code e.g. PublicKeyToken=cd22d2b1bc79915b

    [Assign the Event Handler to a specific list]

    9. Create a Windows application
    10. Add a button and write following code on its click event.


    using System;
    using System.Collections.Generic;
    using System.ComponentModel;
    using System.Data;
    using System.Drawing;
    using System.Linq;
    using System.Text;
    using System.Windows.Forms;
    using Microsoft.SharePoint;

    namespace InstallSPEventHandler
    {
    public partial class Form1 : Form
    {
    public Form1()
    {
    InitializeComponent();
    }

    private void button1_Click(object sender, EventArgs e)
    {

    SPSite site = new SPSite("http://mysite.com:1100");
    SPWeb web = site.OpenWeb();
    SPList survey = web.Lists["Candidates"];

    string assemblyName = "SPListEvents, Version=1.0.0.0, Culture=neutral, PublicKeyToken=cd22d2b1bc79915b";
    string className = "SPListEvents.CandidateListHandler";

    survey.EventReceivers.Add(SPEventReceiverType.ItemAdded, assemblyName, className);
    //survey.EventReceivers.Add(SPEventReceiverType.ItemUpdated, assemblyName, className);
    MessageBox.Show("Done");
    }
    }
    }

    11. Run the Desktop Application and click the button to register the ItemAdded event handler to Candidate list.

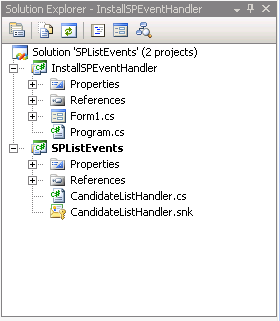
    12.Your solution might look like:

    13. Add new item in Candidate list and Status and Company fields shoyuld get poulated automatically.
    14.That’s it.

    Official SharePoint Documentation

    I have recently contributed to the official SharePoint documentation for developement. Check it out here: https://docs.microsoft.com/en-us...