Content Type Hub is part of Managed Meta Data Service and was introduced into SharePoint to share the Content Types across the site collections and web applications. It was introduced in SharePoint 2010 and now its available in SharePoint 2013 and Office365.
I found this beautiful article to explain how to configure a Content Type Hub to share Content Type across other site collections and web applications:
http://sharepoint-community.net/profiles/blogs/understanding-content-type-hub-cth-in-sharepoint-2013
Note: Its already configured for you in Office365 under http://MyOffice365/sites/contentTypeHub.
Showing posts with label SharePoint 2013. Show all posts
Showing posts with label SharePoint 2013. Show all posts
Monday, August 10, 2015

Wednesday, December 3, 2014
SharePoint 2010 to 2013 Migration
Following are few resources for migrating SharePoint 2010 Content Database to SharePoint 2013:
SharePoint 2013 Upgrade Process
http://www.microsoft.com/en-us/download/details.aspx?id=30371
SharePoint 2013 Upgrade Step by Step From SharePoint 2010
http://www.c-sharpcorner.com/UploadFile/Roji.Joy/sharepoint-2013-upgrade-step-by-step-from-sharepoint-2010
SharePoint 2010 database migration to SharePoint 2013
http://en.share-gate.com/blog/step-by-step-upgrade-sharepoint-2010-database-to-sharepoint-2013
SharePoint 2013 Upgrade Process
http://www.microsoft.com/en-us/download/details.aspx?id=30371
SharePoint 2013 Upgrade Step by Step From SharePoint 2010
http://www.c-sharpcorner.com/UploadFile/Roji.Joy/sharepoint-2013-upgrade-step-by-step-from-sharepoint-2010
SharePoint 2010 database migration to SharePoint 2013
http://en.share-gate.com/blog/step-by-step-upgrade-sharepoint-2010-database-to-sharepoint-2013
Monday, September 22, 2014
Sharepoint 2013 Training
I am providing following training to people who want to learn SharePoint Development.
Please comment on this post for your questions.
Module I - Introduction to SharePoint (8 hr)
Please comment on this post for your questions.
Module I - Introduction to SharePoint (8 hr)
- What is a CMS?
- Microsoft Echo System
- SharePoint Job Roles
- SharePoint Architecture
- 3 Tier Architecture
- Central Admin - Walkthroughof CA
- SharePoint Site - Creating a Site Collection
- List and Libraries - Creating a List
- List and Libraries - Calendar, Tasks, Announcements, Document Lib, Images Lib
- Columns - Text Col, Date Col, Choice Col, Calculated Col, Lookup Col
- Views - Creating a View (Grouping, Filter, Sorting etc)
- Site Collection & Subsite - Difference between Site Collection & Sub Site.
- Site Settings - Change Site Name, Logo etc
- Navigation - Updating the Left Navigation
- Security - Site Owner (Owner), Member(Contributor), Visitor(Reader)
- Document Library - Creating a Document Library, Checking In/Out, Versioning.
- Content Type - Using Content Type in a Doc Lib.
- Editing Pages - Adding text to pages.
- Adding Pages - Creating a New Page
- Web Part - What is a Web Part?
- Adding Web Parts Adding - OOB web parts (Content Editor Web Part, Image Viewer Web Part, Youtube Video embedding).
- Advance Web Parts - List View Web Part etc
- Layout - Modifying the Page Layout
- Business Process - What is a Business Process?
- Workflow - What is a Workflow?
- Design - Design a workflow in Visio.
- Workflow Parts - Condition, Action and Properties.
- Develop - Develop a workflow using SharePoint Designer.
- HTML - Introto HTML5
- Customizing Pages - Creating New Pages
- WebPart - Customization Customizing the DataView Web Part
- Master Page - What is a Master Page? Difference between ASPX and Master Page
- Branding - Customizing the Master Page
- SDLC - Software Development Life Cycle
- C# - Intro to C#, Making the UI, Writing the code.
- ASP.NET - Intro to ASP.NET, Making the UI, Writing the code.
- Visual Web Part Development - Hello World Web Part, Web Part Life Cycle
- CAML - Query SharePoint Data
- Advance Web Part - Accessing data through Web Part
- Feature - Deployment of Web Part through features
- Scope - Farm, Site, Web, Web Application
- Reporting - What is a Report?
- Excel - Introduction to Excel
- Excel Services - Excel Web Access web part
- Publishing - Publishing an Excel to SharePoint.
- Excel Services - PowerPivot
- Excel Services - PowerView
- Dashboard - Lets build a Dynamic Dashboard.
- Java Script - Intro to JavaScript
- App - What is an App?
- SDLC - Software Development Life Cycle
- App LifeCycle - Client Side Object Model
- Development - Developing an App using Visual Studio
- Deployment - Deploying an App
- JSOM - JavaScript Object Model
- Advance App - Data driven app development
- App Security - App Scope and Permissions
Saturday, July 12, 2014
SharePoint - Taxonomy
Taxonomy (Managed Metadata)
According to Microsoft Technet, A taxonomy is a formal classification system. A taxonomy groups the words, labels, and terms that describe something, and then arranges the groups into a hierarchy.
In layman terms, taxonomy is how to categorize the data in a structured way so that its easy to find the required information.
In this post, I will explain how to define taxonomy through Term Store, Content Types etc in SharePoint 2013. Taxonomy is managed by Taxonomy Term Store in SharePoint 2013 where we can create Terms(a Term is a specific word or phrase that you associated with an item on a SharePoint site), Term Sets(a Term Set is a group of related terms) and Groups(a group is a set of term sets).
Lets walk through following steps:
According to Microsoft Technet, A taxonomy is a formal classification system. A taxonomy groups the words, labels, and terms that describe something, and then arranges the groups into a hierarchy.
In layman terms, taxonomy is how to categorize the data in a structured way so that its easy to find the required information.
In this post, I will explain how to define taxonomy through Term Store, Content Types etc in SharePoint 2013. Taxonomy is managed by Taxonomy Term Store in SharePoint 2013 where we can create Terms(a Term is a specific word or phrase that you associated with an item on a SharePoint site), Term Sets(a Term Set is a group of related terms) and Groups(a group is a set of term sets).
Lets walk through following steps:
- Configure Terms in Term Store
- Create Content Type with Managed Metadata
- Add Document and Tag
- Metadata Navigation
1 - Configure Terms in Term Store
- Go to Central Admin and select Managed Metadata Service to launch the Term Store.
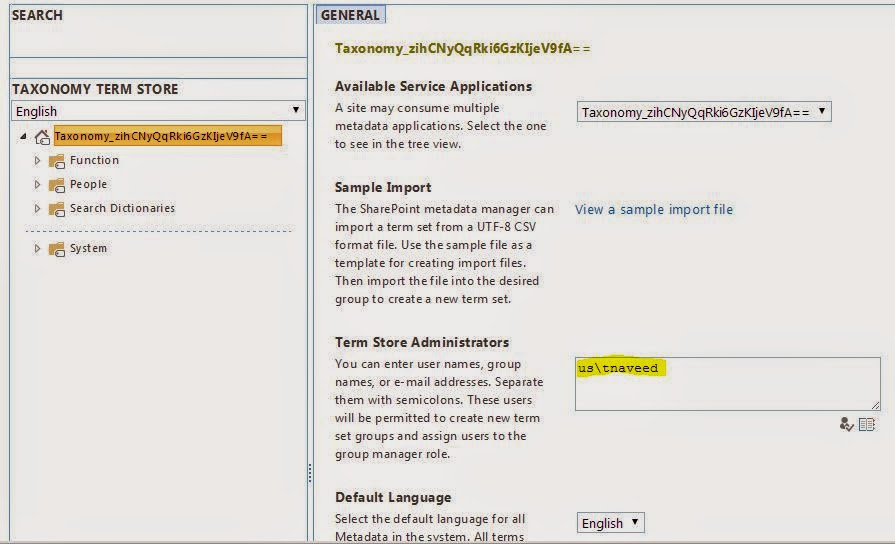
- Provide your ID in Term Store Administrators and hit Save in order to have the right permissions to create Terms.
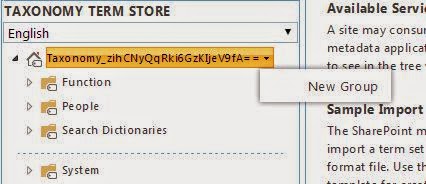
- Select the tiny arrow on Home node (Taxonomy_XXX) and create a new group called Function.
- Create your Term Set (Advisory) and Terms (Business, IT, KM) under Function group.
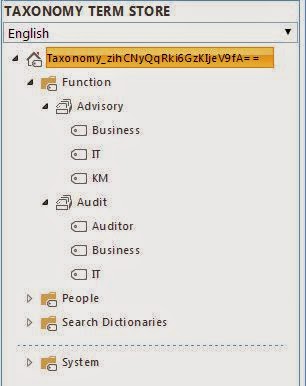
Note: You can provide description of groups, term sets and terms on the right side.
2 - Create Content Type with Managed Metadata
- Launch the Site Collection where you want to use these terms and go to the Site Settings -> Site Columns.
- Create a site column Advisory and type Managed Metadata
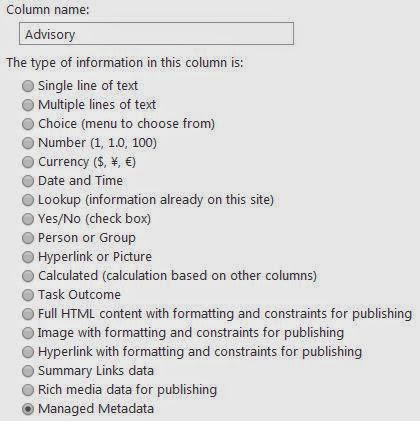
- Under Term Set Settings expand taxonomy and select Advisory term set and hit OK.
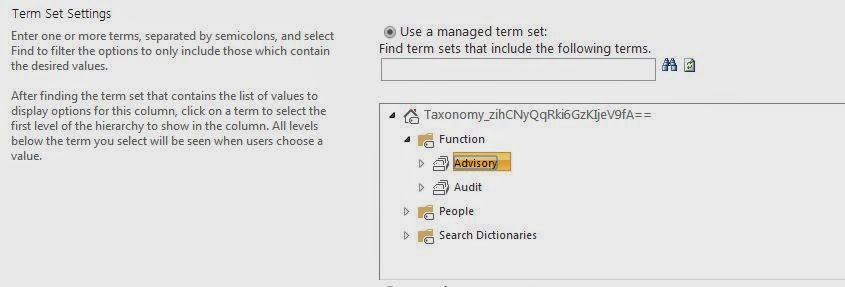
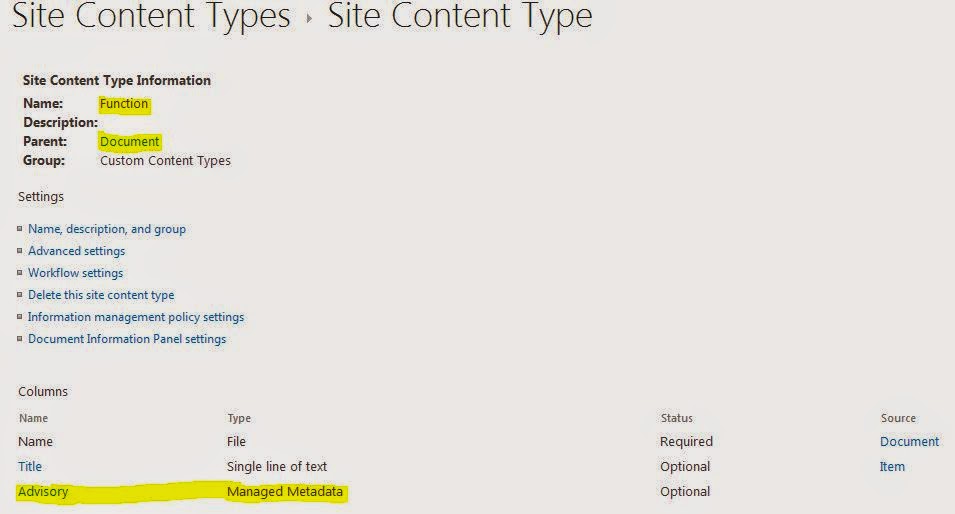
Note: This will map Advisory term set to the Advisory site column. - Create a new Site Content Type Function that will use the Advisory site column
- Add the Function content type to a Document Library
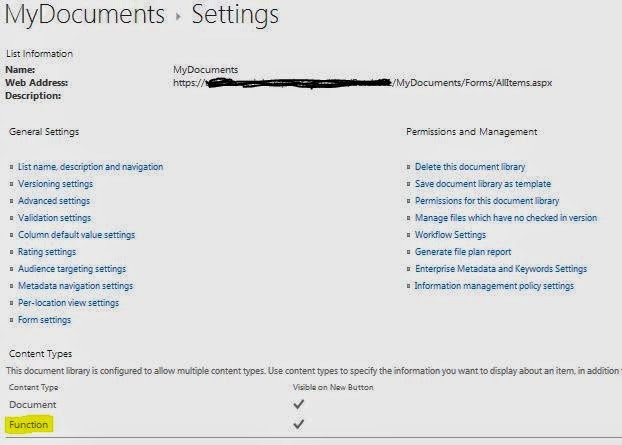
Note: Now the library is ready to use.
3 - Add Document and Tag
- Upload a document in Document Library and select Function content type.
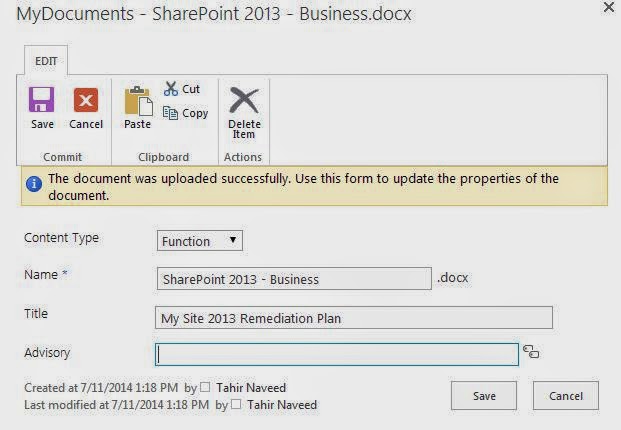
- In Advisory column select a the Term that you want to associate with this document and save.
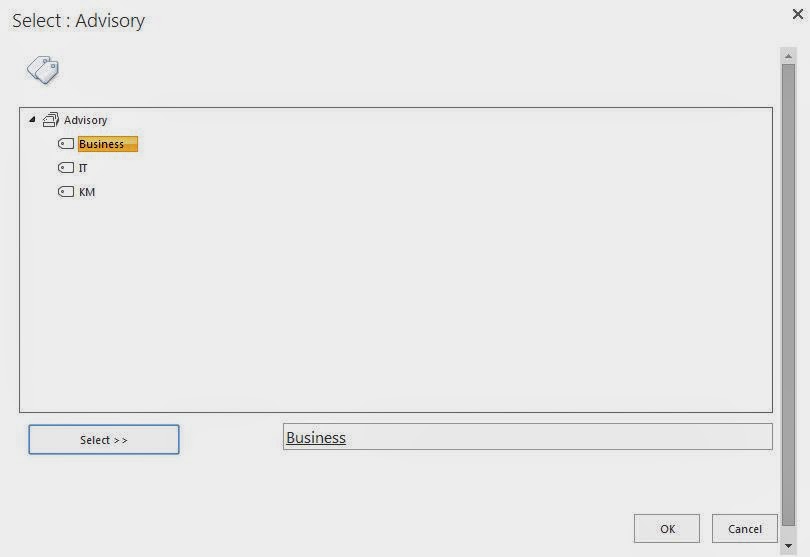
- Add a couple of more documents with different terms
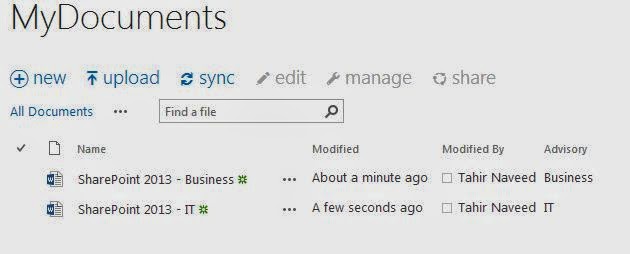
- And that's how you attach Taxonomy Terms (Managed Attributes) with different documents in SharePoint in order to categorize them.
4 - Metadata Navigation
- Go to Library Settings of MyDocuments and select Metadata navigation settings.
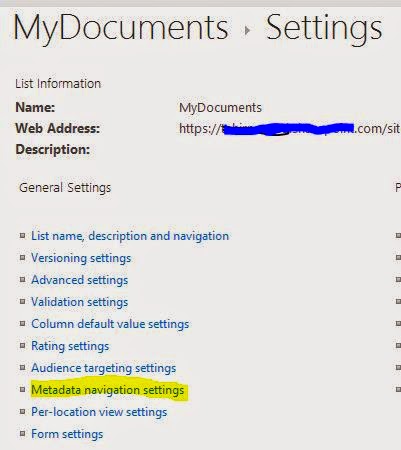
Note: You might have to activate Metadata Field Navigation and Filtering feature from Site Features if this option is not available. - In Metadata Navigation Settings select Advisory as Hierarchy Field.
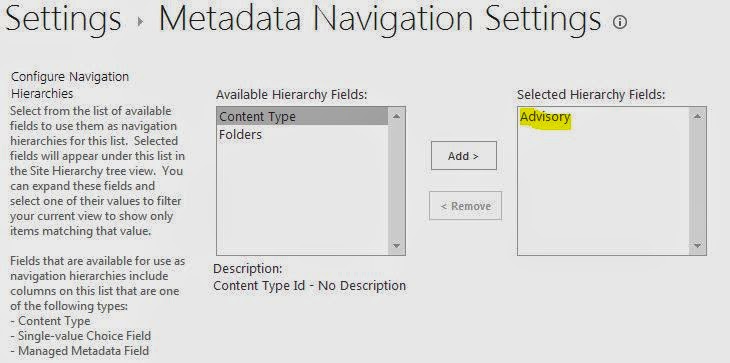
- Go back to the library and Advisory Term Set will appear on the left navigation
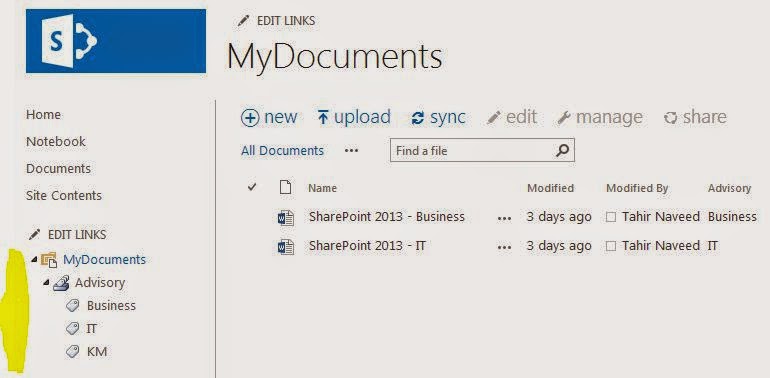
- Select a Term from the navigation and you will see related documents appearing on left.
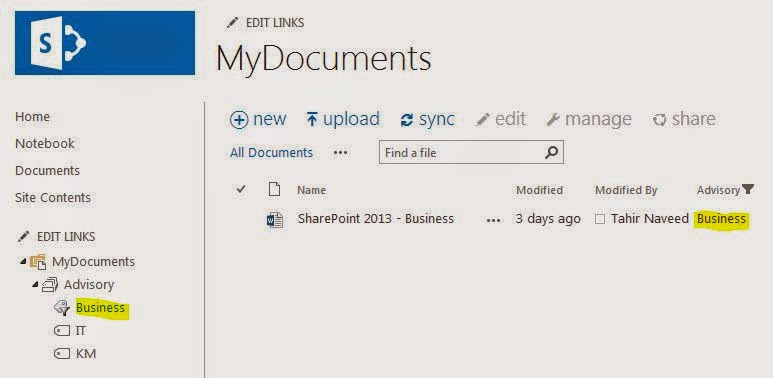
And that's how taxonomy is implemented in SharePoint.
Ref: http://office.microsoft.com/en-us/sharepoint-help/introduction-to-managed-metadata-HA102832521.aspx
Ref: http://office.microsoft.com/en-us/sharepoint-help/introduction-to-managed-metadata-HA102832521.aspx
Tuesday, June 24, 2014
SharePoint 2013 - Delete UserProfile Data with PowerShell
Description:
This PowerShell script will take two input files Users.csv (with all the user names under USERID column) and Properties.csv (with all the properties under TITLE column) and delete the values of UPA properties for the given users.
Script:
This PowerShell script will take two input files Users.csv (with all the user names under USERID column) and Properties.csv (with all the properties under TITLE column) and delete the values of UPA properties for the given users.
Script:
#PowerShell Script - Delete User Profile Properties Data in MySite 2013 UPA

Add-PSSnapin "Microsoft.SharePoint.PowerShell"

function WriteLog
{
    Param([string]$message, [string]$logFilePath)
    Add-Content -Path $logFilePath -Value $message
}


#################################################################################################

$logFile = "D:\PowerShellScripts\DeleteUserProfileDataInUPA\DeleteUserProfileDataInUPA.log"
$batchFile = "D:\PowerShellScripts\DeleteUserProfileDataInUPA\Users.csv"
$PropertiesFile = "D:\PowerShellScripts\DeleteUserProfileDataInUPA\Properties.csv"
$mysiteHostUrl = "http://company.MySite.com"


$mysite = Get-SPSite $mysiteHostUrl
$context = [Microsoft.Office.Server.ServerContext]::GetContext($mysite)
$upm =  New-Object Microsoft.Office.Server.UserProfiles.UserProfileManager($context)

$currentProfile = 0

$Properties = Import-CSV $PropertiesFile

$users = Import-CSV $batchFile
$totalProfiles = $users.Count
ForEach ($user in $users)
{

    $currentProfile ++;
    $AccountName = $user.USERID

    $profile = $upm.GetUserProfile($AccountName)

    try
    {

        forEach ($Property in $Properties)
        {
            $PropertyTitle = $Property.TITLE

            $OldValue = $profile[$PropertyTitle].Value;

            $profile[$PropertyTitle].Value = $null;
            $profile.Commit()

            $now = [System.DateTime]::Now
            $msg = $now.ToString() +  " : Deleting value from "+ $PropertyTitle +": "+ $OldValue +" for " + $AccountName + " (" +$currentProfile + " of " + $totalProfiles + ")"
            write-host $msg
            WriteLog $msg $logFile

        }

    }
    catch [system.exception]
    {
        $msg = $Error[0].Exception.InnerException.InnerException.Message
        write-host -f red $msg
        WriteLog $msg $logFile
    }

    $profile = $Null
    $user = $Null
}


$mysite.Dispose();
Monday, June 16, 2014
SharePoint 2013 - Excel Services (BI Reporting)
Background:
Business intelligence (BI) is a set of theories, methodologies, architectures, and technologies that transform raw data into meaningful and useful information for business purposes. SharePoint 2013's Excel Services have made BI reports publishing a lot easier.
In this post, I am going to create a dynamic report using Power View in Excel and then will publish it in SharePoint 2013/Online. I will use a sample MS Access database (RptSampl.mdb) provided by Microsoft to build a new report. Same concepts covers the reports development for MS SQL Server. This post has following three sections:
Importing the Data into a Excel Report
Designing a Excel Report
Publishing a Excel Report to SharePoint Online/2013
Business intelligence (BI) is a set of theories, methodologies, architectures, and technologies that transform raw data into meaningful and useful information for business purposes. SharePoint 2013's Excel Services have made BI reports publishing a lot easier.
In this post, I am going to create a dynamic report using Power View in Excel and then will publish it in SharePoint 2013/Online. I will use a sample MS Access database (RptSampl.mdb) provided by Microsoft to build a new report. Same concepts covers the reports development for MS SQL Server. This post has following three sections:
- Importing the Data
- Designing a Report
- Publishing a Report to SharePoint.
Importing the Data into a Excel Report
- Download sample database from Microsoft's site.
- Launch MS Excel 2013 and go to POWERPIVOT tab.
- If you don't see this menu then enable it by going to File -> Options.
- Under Add-Ins select Manage: COM Add-ins and then hit Go.

- Check Microsoft Office PowerPivot for Excel 2013 and then hit OK.

- POWERPIVOT tool bar will look like this

- Select Manage and the following window will appear where we will connect to the database, import the data and will arrange the relationship between tables.

- Select Get External Data -> From Database -> From Access

- Select RptSampl.mdb from your downloads folder and it doesn't not need any login and password then hit Next.

- Choose Select from list of tables and views to choose the data to import in the next screen and hit Next again
- Select the tables you want to to add in your report. I will select Products and Suppliers then hit Finish.

You will see data from two tables will get imported into Excel. It will also increase the size of the Excel file. Select Close after data import. - You can select Diagram View from the tool bar to see the relation between tables.

- Hit Save and it will save the data and close the Dialog.
Designing a Excel Report
- Go to INSERT tab and select Power View in Reports section.

- This will open a new work sheet, select Power View tab, show you the imported tables so we can design our report here.

- Expand tables and select fields that needs to be displayed in the report. For this report I will select ProductName and UnitPrice columns from Products table.

- This is your basic report. You can apply filter by clicking the filter button and can perform sorting by clicking the title of the column inside the report.

- You can present the information in a dynamic Chart too by selecting Bar Chart from DESIGN tab

And your report should look like this
- You can add other columns like UnitsInStock, UnitsOnOrder to see how they will look in the report's chart.

- Save the Excel work book in local folder with the name Report.xlsx.
Publishing a Excel Report to SharePoint Online/2013
- Upload the Report.xlsx to a document library in SharePoint Online.

- Click the Report.xlsx inside the document library and SharePoint will open the report inside the browser with Excel Online which is a part of Office Web App (OWA).

And thats how you develop and publish a BI report using Excel Services.
Wednesday, June 4, 2014
SharePoint Online(2013) - Web Part Deployment
In my previous post, I have explained how to develop a SharePoint 2013 web part using Visual Studio. Now lets deploy that web part to the production environment e.g A site collection in SharePoint Online.
- Open the existing Web Part project in Visual Studio 2013.
- Select Feature1 and you can change the scope of the deployment here. Scope: Site means this feature will be a Site Collection feature and web part inside this feature will be available in the whole site collection.

- Select Build -> Publish -> Publish to File System. Provide location and hit Publish. This will generate the WSP (myVisualWebPart.wsp).

- Go to the production site (my production site is on SharePoint Online).
- Go to Site Settings -> Solutions under Web Designer Galleries.

- Select Upload Solution -> Choose file and select the WSP file from your desktop and upload it.

- Once the solution package is uploaded select Activate. This action will activate the feature and make the web part available in the web part gallery.

- If you go to Site Settings -> Site collection features under Site Collection Administration. You will see your feature activated here.


- Now go to any page on the production site and add your web part. It should be available under Custom category.


Thanks heaven for the easy deployment =).
SharePoint 2013 - Web Part Development
In this post, I am going to demonstrate how to develop a SharePoint 2013 Web Part and then deploy it on local SharePoint site. For production deployment see this post.
Lets get started!
Lets get started!
- Launch Visual Studio 2013 with Administrator privileges.
- Select SharePoint Solutions -> SharePoint 2013 - Visual Web Part and provide name of the project along with the location.

- Provide the url of local SharePoint site for debugging then select Deploy as a sandboxed solution option and hit finish.

- You will see the basic structure of the Visual web part created along with one User Control (ASCX) to handle GUI elements and one Feature to handle packaging (WSP).

- Open the user control (VisualWebPart1.ascx) and add following ASP.NET Grid.
<asp:GridView ID="gvProducts" runat="server" />
- Open the code behind of the user control (VisualWebPart1.ascx.cs) and add the following code:
Add Reference to SharePoint API
Add CreateChildControls() functionusing Microsoft.SharePoint;
Your code should look like this:protected override void CreateChildControls() { SPSite objSite = SPContext.Current.Site; using (SPWeb objWeb = objSite.OpenWeb()) { SPQuery objQuery = new SPQuery(); objQuery.ViewFields = "<FieldRef Name='ID' /><FieldRef Name='Title' /><FieldRef Name='Author' />"; objQuery.ViewFieldsOnly = true; SPList objList = objWeb.Lists["ListA"]; SPListItemCollection oCollection = objList.GetItems(objQuery); gvProducts.DataSource = oCollection.GetDataTable(); gvProducts.DataBind(); } }
- Select Build -> Deploy Solution.
- Open IE and go to the site specified in the step 3. Edit the home page and select Insert -> Web Part. You should see this web part under Custom category, select and add the webpart.

- It should display like this

Sunday, June 1, 2014
SharePoint 2013 - App Development
In this post, I will explain how to read list data from a SharePoint 2013 App using Javascript Object Model (JSOM). So sit tight as it's about to get bumpy in here!!!
Here are Common Programming Tasks using Javascript Object Model. Now you are ready to create your million dollar App =).
- Launch Visual Studio 2013 and Create a SharePoint 2013 App project.
- Data is in an Announcement list that will be accessed by this App. My Announcement list has two columns: Title(Text) and Status(Yes/No).
- Add a button and a table in Default.aspx in Pages in Solution Explorer
<asp:Content ContentPlaceHolderID="PlaceHolderMain" runat="server"> <div> <p id="message"> Click the button... </p> </div> <input type="button" value="Get Announcements" onclick="GetAnnouncements()" /> <table id="tblItems" border="1" width="500"></table> </asp:Content> - Now open App.js under Scripts and add the following code
'use strict'; var context; var web; var hostWeb; var user; var hostweburl; var appweburl; var appContextSite; var list; var collList; var appContextSite; function getUrl() { hostweburl = getQueryStringParameter("SPHostUrl"); appweburl = getQueryStringParameter("SPAppWebUrl"); hostweburl = decodeURIComponent(hostweburl); appweburl = decodeURIComponent(appweburl); $("#hostWebURL").text("Host Web URL: " + hostweburl); $("#appWebURL").text("App Web URL: " + appweburl); } function getQueryStringParameter(paramToRetrieve) { var params = document.URL.split("?")[1].split("&"); var strParams = ""; for (var i = 0; i < params.length; i = i + 1) { var singleParam = params[i].split("="); if (singleParam[0] == paramToRetrieve) return singleParam[1]; } } // This code runs when the DOM is ready and creates a context object which is needed to use the SharePoint object model $(document).ready(function () { context = SP.ClientContext.get_current(); web = context.get_web(); getUrl(); }); function GetAnnouncements() { //alert('hello'); appContextSite = new SP.AppContextSite(context, hostweburl); var oList = appContextSite.get_web().get_lists().getByTitle('Announcements'); var camlQuery = new SP.CamlQuery(); camlQuery.set_viewXml( '<View><Query><Where><Geq><FieldRef Name=\'ID\'/>' + '<Value Type=\'Number\'>1</Value></Geq></Where></Query>' + '</View>' ); this.collListItem = oList.getItems(camlQuery); context.load(collListItem); context.executeQueryAsync( Function.createDelegate(this, onQuerySucceeded), Function.createDelegate(this, onQueryFailed) ); } function onQuerySucceeded() { var listItemEnumerator = collListItem.getEnumerator(); var str = ''; while (listItemEnumerator.moveNext()) { var oListItem = listItemEnumerator.get_current(); var imageStatus = ''; if (oListItem.get_item('Status') == 'Yes') { imageStatus = '<img src=../Images/Yes.jpg />' } else { imageStatus = '<img src=../Images/No.png />' } str = str + "<tr><td>" + oListItem.get_item('Title') + "</td><td>" + imageStatus + "</td></tr>"; } $('#tblItems').append(str); } function onQueryFailed(sender, args) { $('#message').text('Request failed. ' + args.get_message() + '<br/>' + args.get_stackTrace()); }- Open AppManifest.xml and under Permissions tab, set List under Scope and FullControl under Permission section. This will tell user that this App needs access on Host Site's lists.

- Hit the Play button and if the forces are with you then your app should look like this after successful deployment.

Here are Common Programming Tasks using Javascript Object Model. Now you are ready to create your million dollar App =).
SharePoint 2013 - Hello World App
Hello World!!! Lets create a SharePoint 2013 App.
Following are the quick steps to create a SharePoint Hosted App using Visual Studio 2013:
Following are the quick steps to create a SharePoint Hosted App using Visual Studio 2013:
- Launch Visual Studio 2013.
- Select File -> New Project
- Select App for SharePoint 2013 and provide name and location of the project

- Provide url of the developer site (Site collection created by using Developer Site template) and select SharePoint Hosted App in hosting option then select Finish.

- Hit Start from the tool bar, it will compile and deploy the app to your developer site.

Subscribe to:
Posts (Atom)
-
 Scenario: Updating the Master Page for SharePoint Online is not recommended by Microsoft now.....fine. So how do we change the UI then? And...
 -
 Microsoft introduced Office Graph a couple of months back which uses machine learning techniques to connect people to the relevant content,...
 -
 Recently I came across this amazing article of Claudio ( http://www.endusersharepoint.com/2009/04/20/finally-dynamic-charting-in-wss-no-code...