Top Menu

Sunday, November 15, 2009

Get the actual error message in SharePoint Site Page


In web.config change the following:

1. CallStack="false"

2. <customErrors mode="On" />

Now refresh the page to see the actual ASP.NET error message.

Before:


After:

Monday, November 9, 2009

Security on SharePoint Website Controls with SPSecurityTrimmedControl


I came across a requirement while building a site in SharePoint 2007 where I have to display the left menu only to administrator and Thanks to Mark Wagner for his quick and to the point post on SPSecurityTrimmedControl.

What exactly I did was:

1. Open the Default.aspx in SharePoint Designer.
2. Select the left menu and then select Create Custom Content.
3. Arranged the tags as follow:

<asp:content contentplaceholderid="PlaceHolderLeftNavBar" id="Content2" runat="server">
<sharepoint:spsecuritytrimmedcontrol permissionsstring="ManageWeb" runat="server">

All the divs and HTML for the menu goes here.

</sharepoint:spsecuritytrimmedcontrol>
</asp:content>

Now the menu will only appear for users having administrator rights.
Note: Also, you can directly implement this in Master Page for hiding View All Site Content.

Tuesday, July 14, 2009

SharePoint 2003 to MOSS 2007 Migration

Senario: You have two servers. One has SharePoint 2003 and other have MOSS 2007 installed. You want to migrate a website collection from SharePoint 2003 to MOSS2007.
Scan the SharePoint 2003 Website
1. PreScan Tool
prescan.exe /c preupgradescanconfig.xml /v http://intranet2. Check the Orphan Records
stsadm -o databaserepair -url http://intranet -databasename MyIntranet_Site3. Delete the Orphan Records
stsadm -o databaserepair -url http://intranet -databasename MyIntranet_Site -deletecorruption4. Check the Orphan Records
stsadm -o databaserepair -url http://intranet -databasename MyIntranet_Site
5. PreScan Tool
prescan.exe /c preupgradescanconfig.xml /v http://intranet

Content Database Migration
1. Go to SQL Server and create the website’s Content Database's backup after making it read only.
2. Copy the database's backup file to the New Server.
3. Create a new Database in New SQL Server and Restore the database (overwrite).

Create the MOSS 2007 Website
1. Create the WebApplication in MOSS 2007. Don’t create any site collection.
2. Remove the content application database
stsadm.exe -o deletecontentdb -databasename WSS_Content_Intranet_80 -url http://newintranetsite/
3. Attach the new database
stsadm.exe -o addcontentdb -url http://newintranetsitet/ –databasename Portal_Site_Restore

Ref 1: http://farhanfaiz.wordpress.com/2008/05/23/sharepoint-upgrade-database-migration
Ref 2: http://sharemypoint.blogspot.com/2007/04/prescanexe-finished-with-failure.html

Monday, July 6, 2009

SharePoint Designer 2007 - Hide the Quick Launch Link

Today my manager came up with the requirement that Recycle Bin Link in Quick Launch Menu should be visible to Administrator only.
If it was the case for a webpart then I could easily specify the Target Audience and voila. But unfortunately webpart zone is not available for Quick Launch Menu and I didn’t want to write custom menu just to hide the RecycleBin link so the genius came up with the following dirty trick. (Yes, I have recognized myself as a genius since childhood).

1. Launch the SharePoint Designer.
2. Navigate to _catalogs -> masterpage -> default.master.
3. Create a backup of the master page file and open original for editing.
4. Scroll down till the bottom and paste the following javascript code right before </Body> Tag:


var UserID = document.getElementById('zz8_Menu').innerHTML;
UserID = UserID.split('<')[0]; UserID = UserID.split('\\')[1]; if (UserID != 'Administrator') { //Hide Recyclebin var objRecycleBin = document.getElementById('ctl00_PlaceHolderLeftNavBar_idNavLinkRecycleBin'); if (objRecycleBin) { objRecycleBin.style.display = 'none'; } }

5. Save and it should hide Recyclebin for all users except for the administrator.

Note: Please check for the Ids ctl00_PlaceHolderLeftNavBar_idNavLinkRecycleBin and zz8_Menu by view source.

SharePoint Designer 2007 - Join Two Lists

We all come across situation at times when we have to display data from two different lists in a single view, specially in reporting. I was looking if SharePoint Designer support something like Join View etc when I came across Sahil Malik's following amazing article:

URL: http://blah.winsmarts.com/2007-10-Performing_joins_between_SharePoint_lists.aspx?postID=359


Tuesday, June 30, 2009

SharePoint Website – Login Dialog Fix

Problem: Windows user get Login dialog again and again when visiting the page with custom webparts, even when they are logged into the site.

Solution:
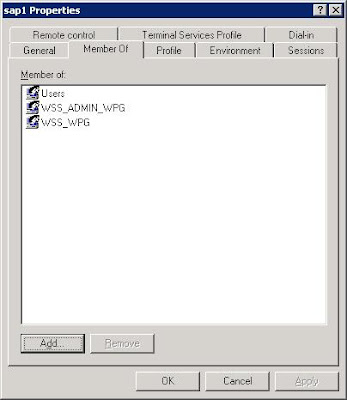
1. Open Computer Management and select Users.
2. Double click the user and select Member Of tab and add WSS_WPG.


This will add user to WSS_WPG group and it should solve the problem.

Note: Removing users from WSS_ADMIN_WPG will hide Site Actions from the website.

Wednesday, June 3, 2009

SharePoint: List Event Handler

Sometimes we get business requirements like populate a particular field with some pre-defined specific data when item is added or send an alert when item is added etc. SharePoint Designer Workflows solve these kind of basic problem like sending alerts, update the list item etc BUT you need event handlers to be more flexible and to have more control.

In this post I will explain how to quickly develop and deploy SharePoint List Events.

1. Create a Class Library Project.
2. Add reference to SharePoint DLL.
3. Inherit your class with SPItemEventReceiver
4. Override ItemAdded(SPItemEventProperties properties) function
5. Your code should look like:


using System;
using System.Collections.Generic;
using System.Linq;
using System.Text;
using Microsoft.SharePoint;

namespace SPListEvents
{
public class CandidateListHandler: SPItemEventReceiver
{
public override void ItemAdded(SPItemEventProperties properties)
{
try
{
SPListItem item = properties.ListItem;
item["Status"] = "Added";
item["Company"] = "Company1";
item.Update();

}
catch (Exception exp)
{
//do something with exp
}
finally
{
base.ItemAdded(properties);
}
}
}
}

Above code will get fired on the associated list, when a new item will be created. Pretty easy hah.

6. Sign your dll by selecting Project -> Properties ->
Signing Tab and should look like:


7. Compile
8. Deploy the SPListEvents.dll to GAC (c:\windows\assembly)

Note down the Public Key Token for the installed DLL to use it in the below deployment code e.g. PublicKeyToken=cd22d2b1bc79915b

[Assign the Event Handler to a specific list]

9. Create a Windows application
10. Add a button and write following code on its click event.


using System;
using System.Collections.Generic;
using System.ComponentModel;
using System.Data;
using System.Drawing;
using System.Linq;
using System.Text;
using System.Windows.Forms;
using Microsoft.SharePoint;

namespace InstallSPEventHandler
{
public partial class Form1 : Form
{
public Form1()
{
InitializeComponent();
}

private void button1_Click(object sender, EventArgs e)
{

SPSite site = new SPSite("http://mysite.com:1100");
SPWeb web = site.OpenWeb();
SPList survey = web.Lists["Candidates"];

string assemblyName = "SPListEvents, Version=1.0.0.0, Culture=neutral, PublicKeyToken=cd22d2b1bc79915b";
string className = "SPListEvents.CandidateListHandler";

survey.EventReceivers.Add(SPEventReceiverType.ItemAdded, assemblyName, className);
//survey.EventReceivers.Add(SPEventReceiverType.ItemUpdated, assemblyName, className);
MessageBox.Show("Done");
}
}
}
11. Run the Desktop Application and click the button to register the ItemAdded event handler to Candidate list.

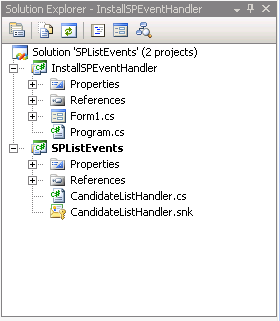
12.Your solution might look like:


13. Add new item in Candidate list and Status and Company fields shoyuld get poulated automatically.
14.That’s it.

Official SharePoint Documentation

I have recently contributed to the official SharePoint documentation for developement. Check it out here: https://docs.microsoft.com/en-us...