Top Menu

Monday, January 24, 2011

Silverlight Application in SharePoint 2010

In my last post I have explained how to develop the Silverlight application using Visual Studio 2010. Then we deployed that application in SharePoint 2007 using Content Editor Webpart. In this post I will explain how to deploy the same application in SharePoint 2010 using Silverlight Webpart.

Note: Please click here for the Silverlight application development using Visual Studio 2010. This Hello World Silverlight application can be deployed on both SharePoint 2007 and 2010.

Deployment to SharePoint 2010
  1. Go to the SharePoint portal.

  2. Upload the SilverlightApp.xap to a document library.

  3. Create a sample webpart page.

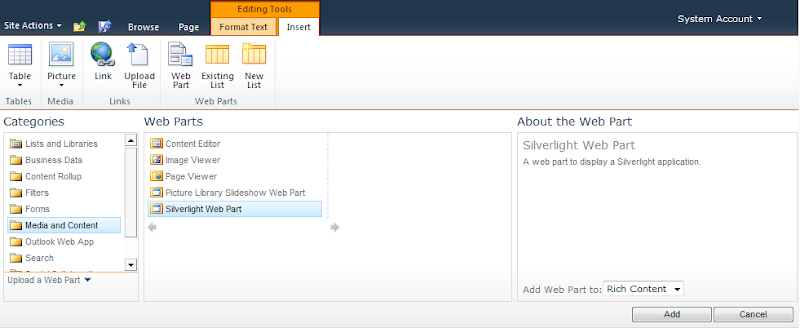
  4. Open the page in Edit mode and from the ribbon select Editing Tools -> Insert -> Web Part.

  5. From categories select Media and Content -> Silverlight Web Part -> Add.


  6. Provide the URL of the SilverlightApp.xap file and hit OK.


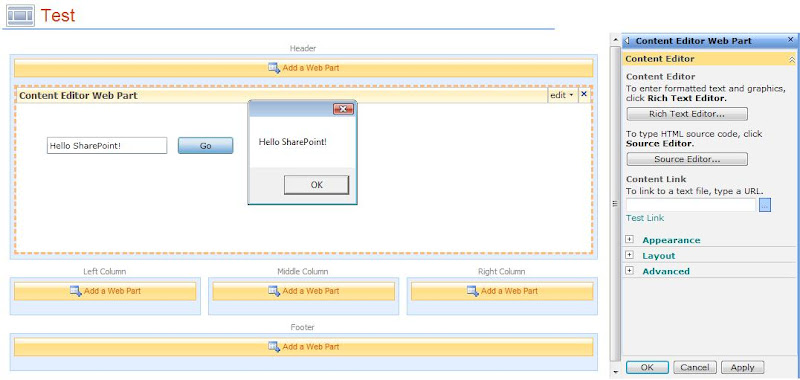
  7. It should look like this

Pretty easy hah! =]

Wednesday, January 19, 2011

Silverlight Application for SharePoint 2007


The goal of this post is to guide the .NET developers to write a basic Silverlight 3 application using Visual Studio 2010 and then deploying it to SharePoint 2007. Trust me its pretty easy :).

Development with Visual Studio 2010
Following are the steps to develop a simple Silverlight 3 application using Visual Studio 2010:

  1. Launch Visual Studio 2010

  2. Select File -> New -> Project -> Silverlight Application and hit Ok.


  3. Uncheck Host the Silverlight Application in a new Web site and select OK. We don’t want to host our Silverlight application in a ASP.NET Web application rather we will host it in a simple HTML page. This HTML Page will get created by the project.

  4. Now you are ready to do the development on MainPage.xaml.

  5. Drop a Textbox(txtMessage) and a Button(btnGo) on MainPage.xaml from the Toolbox on the left.


  6. Double click on the button to get it’s click event handler and paste following code there:

  7. namespace SilverlightApp  
    {  
    public partial class MainPage : UserControl  
    {  
        public MainPage()  
        {  
            InitializeComponent();  
        }  
        private void btnGo_Click(object sender, RoutedEventArgs e)  
        {  
            MessageBox.Show(this.txtMessage.Text);  
        }  
    }  
    }  
    

  8. Go to bin folder and you will see a HTML file (In my case its SilverlightAppTestPage.html). Launch that HTML file and it should display your Silverlight application. Clicking the Go button should display the text entered in the Textbox.


Note: When Silverlight application is compiled, Visual Studio generates a XAP file (compiled silverlight application) which runs in a silverlight enabled browser. HTML page contains the object tag to load the Silverlight control which runs the Silverlight application.

Deployment to SharePoint 2010
Following are the steps to deploy the Silverlight application in to a SharePoint 2007 site:

  1. Goto a SharePoint portal.

  2. Upload the Silverlight.xap file in a document library.

  3. Create a test ASPX page and add a Content Editor Web Part on it.

  4. Paste following HTML object code in the ContentEditor Web Part:

  5. <object type="application/x-silverlight-2" width="600" height="200">
        <param name="source" value="SilverlightApp.xap"/>
        <param name="minRuntimeVersion" value="3.0.40818.0" />
        <param name="background" value="white" />
    </object>
    <iframe id="_sl_historyFrame" style="height:0px;width:0px;border:0px"></iframe>
    

  6. Make sure to change the parth of the XAP file from the document library.

  7. Exit the edit mode.

  8. The Silverlight application should be displayed in the test page.


Thanks for reading :).

Tuesday, November 2, 2010

View All XML Data via XSLT


Some times we have to debug the XSLT for a WebPart (which generates XML data as output e.g. Search Core Results WebPart in MOSS) to manipulate the results. The first step of XSLT debugging is to see if the generated XML is valid and have all the necessary data.

Following is the code XSLT snippit to display all the XML elements:


<xsl:copy-of select="*"/>


Monday, October 4, 2010

MOSS Development/Customization Training

In April 2010, my manager Pradeep Thekkethodi asked me to conduct a Microsoft Office SharePoint Server 2007 Development training to upgrade the skills of our colleagues with .NET experience. The idea was to quickly bring the developers up to the speed for SharePoint Development and Advance Customization with SharePoint Designer 2007 and Visual Studio 2008. This training was held in our company Orion Systems Integrators Inc. This training was attended by 12 professionals.

I joined hands with my colleague Pramod who is a SharePoint Architect and we came up with a following course outline:

Module 1: SharePoint Object Model – 2 Hrs - Pramod
• SharePoint Object Model – Farm, Web Application, Site Collection, Sites and Site elements
• Navigation, Access control and security, Site directory, Site columns, Content types
• Lists and Views, Search, Extra-net Usage

Module 2: Site Tools – 2 Hours – Tahir
• Create custom lists
• Create custom default views for lists
• Create custom web pages and web part zones
• Insert and configure web parts
• Connect web parts to filter data

Module 3: Master Pages – 2 Hours – Tahir
• Understand the structure of master pages.
• Modifying Master Pages
• Creating a Custom Master Page
• Creating a Custom Cascading Style Sheet
• Creating a Web Page from a Master Page
• Understand the purpose and use of Cascading Style Sheets.
• Attach and customize master pages.
• Create content pages from master pages.

Module 4: Forms and Data – 4 Hours – Tahir
• Creating a Formatted View
• Creating a Merged Data Source
• Creating a Custom Data View Page
• Applying Conditional Formatting
• Create and customize Data Views.
• Use conditional formatting to identify data changes.
• Create custom data sources
• Create linked and merged data sources

Module 5: Automating Business Processes - 4 Hours – Tahir
• Implementing Workflows Using Workflow Designer
• Create a SharePoint Designer Workflow
• Using Conditions and Actions
• Verifying and Deploying a Workflow
• Describe Workflows in SharePoint and SharePoint Designer
• Create a workflow through Workflow Designer
• Add conditions and actions to a workflow.

Module 6 and 7: Web Part Development – 4 Hours – Tahir
(Prereq: ASP.NET, C# & SharePoint)
• Creating, deploying and debugging ASP.NET Web Parts in WSS
• Writing CAML to retrieve and store data.
• Deploying WebPart

Module 8: Event Handlers – 4 hrs – Tahir
• List Event Handlers
• Deployment

Model 9: Logical Architecture, Performance Optimization and Tuning – 2 Hours – Pramod
• Client Side Performance issue
• Server side performance issues

Model 10: Best Practices, Information Architecture, Governance Planning - Pramod
• Best Practices for SharePoint implementation and Designing

Wednesday, July 28, 2010

Update a List Column using JQuery with SharePoint WebServices


Scenario: Click on the image in data View to update the Status on an item.
PreReq: A list with choice column Status (0,1,2).
0 represents Not started,
1 represents In Progress and
2 represents Completed.

You need two libraries:
1. JQuery (jquery-1.4.2.js)
2. SPServices (jquery.SPServices-0.5.6.min.js)

Add following code in your page in the head, or where ever you want to:

<script type="text/javascript" src="Scripts/jquery-1.4.2.js"></script>  
<script type="text/javascript" src="Scripts/jquery.SPServices-0.5.6.min.js"></script>  
  
<script type="text/javascript">  
  
function UpdateStatusCode(divId, waitMessage, ID, StatusCode)  
  {  
    
   //alert(divId +" "+ waitMessage +" "+ ID + " " + StatusCode);  
   if (confirm ("Are you sure you want to update the status of the selected event?"))  
   {  
    StatusCode = StatusCode + 1;  
      
    if (StatusCode < 3)  
    {  
     $(divId).html(waitMessage).SPServices({  
     operation: "UpdateListItems",  
     listName: 'Events',  
     ID: ID,  
     valuepairs: [["Status", StatusCode]],  
     completefunc: function (xData, Status) {  
      var out = $().SPServices.SPDebugXMLHttpResult({  
       node: xData.responseXML,  
       outputId: divId  
      });  
        
      window.location = RefreshPageURL('Default.aspx');  
  
      }  
     });  
    }  
    else  
    {  
     alert('This event is already completed.');  
    }  
   }  
  }  
</script>  

Place the following div where you want to display the status column in the DataView Webpart. XSL in the <div> will display the relevant image and click event on the div will call the UpdateStatusCode() function to update the value on StatusCode column via JQuery and then page will get refreshed to show the right image based on the updated value.

<div id="div+{@ID}" onclick="UpdateStatusCode('div'+{@ID}, 'Updating', {@ID}, {@Status});">  
<xsl:if test="@Status = '0'"><img src="images/NotStarted.png"></xsl:if>  
<xsl:if test="@Status = '1'"><img src="images/InProgress.jpg"></xsl:if>  
<xsl:if test="@Status = '2'"><img src="images/Completed.jpg"></xsl:if>  
</div>  


JQuery makes life easy :o).
Thursday, July 8, 2010

SharePoint WebPart Custom Properties


Add the following piece of code (to create the custom property Password for your custom WebPart) in your WebPart class. Now the property will get displayed under Parameters section in the Property panel of the WebPart as displayed in the screenshot below.


private string _strPassword;


[Browsable(true),
Category("Parameters"),
DefaultValue(""),
WebBrowsable(true),
Personalizable(PersonalizationScope.Shared),
WebDisplayName("Password"),
Description("Network Password")]
public string strPassword
{
    get
    {
        return _strPassword;
    }
    set
    {
        _strPassword = value;
    }
}

Now Access strPassword anywhere in the code to access the value provided by the user.


Friday, June 4, 2010

SharePoint 2007 Web Service: Get Items

Use lists.asmx to get the items through a desktop application

Below is the C# function to call the lists.asmx MOSS Web Service to get list items from a list/document library.
Add reference to lists.asmx to your project and use the following code:


private void GetItems(string strListName)
{

try
{
    #region Connect to URL

    this.m_objWSSListService.Url = this.cmbURL.Text.Trim('/') + "/_vti_bin/lists.asmx";

    string sDomain = string.Empty;
    string sUserName = this.txtLogin.Text.Trim();
    if (sUserName.IndexOf("\\") > 0)
    {
        sDomain = sUserName.Split("\\".ToCharArray())[0];
        sUserName = sUserName.Split("\\".ToCharArray())[1];
    }

    this.m_objWSSListService.Credentials = new System.Net.NetworkCredential(sUserName, this.txtPassword.Text.Trim(), sDomain);

    #endregion

    string sListName = strListName;
    string SourceDocumentURL = "";
    string strTempLocation = "C:\\Temp\\";
    string strFileName = "";

    System.Xml.XmlNode xnListSchema = m_objWSSListService.GetList(sListName);

    //get the Data from the List
    System.Xml.XmlDocument xdListData = new System.Xml.XmlDocument();
    System.Xml.XmlNode xnQuery = xdListData.CreateElement("Query");
    System.Xml.XmlNode xnViewFields = xdListData.CreateElement("ViewFields");
    System.Xml.XmlNode xnQueryOptions = xdListData.CreateElement("QueryOptions");

    System.Xml.XmlNode xnListData = m_objWSSListService.GetListItems(sListName, null, xnQuery, xnViewFields, null, xnQueryOptions);


    if (!Directory.Exists(strTempLocation))
    {
        Directory.CreateDirectory(strTempLocation);
    }

    foreach (XmlNode outerNode in xnListData.ChildNodes)
    {
        if (outerNode.NodeType.Equals(System.Xml.XmlNodeType.Element))
        {
            foreach (XmlNode node in outerNode.ChildNodes)
            {
                if (node.NodeType.Equals(System.Xml.XmlNodeType.Element))
                {
                    MessageBox.Show(node.Attributes.GetNamedItem("ows_Title").InnerText);
                }
            }
        }
    }

}
catch (System.Exception ex)
{

    this.WriteLog(ex.ToString());
}

}

Official SharePoint Documentation

I have recently contributed to the official SharePoint documentation for developement. Check it out here: https://docs.microsoft.com/en-us...